Monday, December 26, 2011

Merry Christmas!


I hope you all had a great Christmas! The following is a sort of recipe-palooza! I think it's a pretty good sample of what we've been eating the past few days...and some was just too good not to share! I'm listing the recipes in chronological order, because, well, if you know me, that's how freakishly organized I am!


We went to my in-law's house on Christmas Eve, and their holiday trademark has got to be the fried oysters.  Seriously, everyone I tell about the oysters is like, "what?" Think clam strips on a larger scale...and they are VERY good with a cold glass of white wine! There is no actual "recipe" per se, but I got the "lowdown" from my mother-in-law: the oysters are purchased from the seafood department of the supermarket and are kind of a gray, gooey thing in a plastic container. I believe they can be dried with a paper towel and pounded out with a meat tenderizer to a nice big, flat "patty". Dredge them first in an egg and milk bath, then in flour. Now the secret touch: put them back in the egg and milk mixture and then into crushed saltine crackers. Then chill.  To prepare, heat a mixture of Crisco and margarine in a skillet and fry till golden. Oh my, and yum! My husband reheats leftovers the next day, but I think they are best when freshly made.


I tried something new Christmas morning: French Toast Casserole! I usually just throw some refrigerated cinnamon rolls in a baking dish on Christmas morning while the coffee is brewing, but saw this fairly simple recipe in Family Fun magazine, so....

French Toast Casserole

small loaf of firm, white bread
1/3 cup pecans or walnuts
1/2 cup brown sugar
1 tsp. cinnamon, or to taste
8 eggs
1 3/4 cups milk
2 tsp. vanilla

Grease a 13 x 9 baking dish.  Cut the bread into one-inch cubes.  Chop the nuts. In a small bowl, combine the brown sugar, cinnamon and chopped nuts.  Arrange half the bread in a single layer in the prepared dish, then sprinkle half the sugar mixture evenly over the top.  Add a second layer with the remaining bread and the sugar mixture.  In a large bowl, whisk together the eggs. Add the milk and vanilla extract, whisking until well blended. Starting from the sides of the dish and working toward the center, pour the egg mixture evenly over the bread.  With a spatula, gently press down on the bread to coat it with the egg mixture.  Cover the dish with aluminum foil and refrigerate overnight, or at least 4 hours.  Heat the oven to 350 and bake the casserole covered for 20 minutes, then remove the foil and continue baking until the casserole turns a light golden brown and looks slightly puffed; about 30 minutes more.  Serve the casserole warm with maple syrup.


For Christmas Day lunch, I made pork tenderloin, au gratin potatoes, green bean casserole and crescent rolls. The pork tenderloin is a favorite at my house, and it is RIDICULOUSLY easy:

Simple Savory Pork Tenderloin (thanks to www.allrecipes.com)

1 1/2 Tbl. fresh rosemary (I used dried)
2 tsp. garlic salt
1/4 tsp. freshly ground black pepper
3 pounds boneless pork tenderloin (mine was actually 2 1/2 pounds)

Preheat oven to 325. In a large resealable plastic bag, mix rosemary, garlic salt and pepper.  Place pork tenderloin in the bag, seal and toss until thoroughly coated with the spice mixture.  Transfer to a medium baking dish.  Cook for one hour in the preheated oven, or to an internal temperature of 160 degrees. 


And let's not forget the ever-festive green bean casserole! If for some reason you don't have the recipe, here you go:

Green Bean Casserole

two 14-16  ounce cans french-style green beans
3/4 cup milk
10-ounce can cream of mushroom soup
1/8 tsp. black pepper
1 small can french fried onions

Combine milk, soup and pepper in a mixing bowl.  Add beans and 1/3 can of onions.  Pour into a 1 1/2-quart baking dish.  Bake at 350 for 30 minutes.  Stir and top with remaining onions. Bake five additional minutes.


From my house to yours; Happy Holidays!

Friday, December 23, 2011

White Christmas!


Every year I look forward to my girlfriend Susie's "White Christmas" concoction - it just wouldn't be Christmas without it! I could make it myself, but it's more fun to receive this yummy gift each year! I found the recipe online, so I can "share the love"! Enjoy!


White Chocolate Chex Mix 

3 cups rice Chex cereal
3 cups corn Chex cereal
*or, you can use 6 cups Crispix cereal
3 cups Cheerios cereal
2 cups pretzel sticks
2 cups peanuts
12 ounces "holiday" M&Ms
1 pound white chocolate bark or discs

Stir together dry ingredients.  Melt white chocolate per package directions and pour over dry ingredients.  Stir to coat.  Pour onto waxed paper to cool. Break into pieces once cooled.

Tuesday, December 20, 2011


And...the baking continues! In the past two days, I've made some additional date pinwheel cookies, gingerbread "birds" and "turtle" cookies. I also spent the morning cutting out snowflakes with my 2 1/2 year old and planning dinner for Christmas Day (more on that later).

I don't have a great gingerbread recipe passed down over the years; I use a boxed mix that you just add water to. I could probably find a recipe in one of my Grandma's old cook books, but I'm sure if you go to Martha Stewart's website you can find a nice old-fashioned recipe. Of course, my "easy" version was complicated by the fact that I don't have a bird-shaped cookie cutter; I drew a cardboard template and cut around it with a small paring knife. I do sometimes get a little overly-creative (i.e. crazy) at this time of year, despite my lack of time and energy! Seriously though, they turned out great!


The "turtle" cookies aren't from scratch either...a girl's got to have a few shortcuts to avoid a total breakdown!

Sunday, December 18, 2011


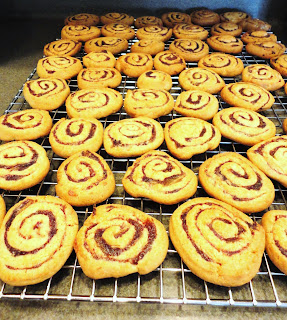
Christmastime is for family, traditions and good memories. So here's some of mine...Date Pinwheel Cookies! Not a very mainstream Christmas cookie, but popular in my family! Over the years I have encountered those who've never heard of them, but liked them after trying them (they taste similar to Fig Newtons)! My maternal grandmother made them every Christmas, until her death in 2001, and on one occasion (when I was in my twenties) I actually got to help her make them in her little retirement apartment oven; so I have "insider" knowledge the rest of my family wasn't privy to!


Grandma Beckner's Date Pinwheel Cookies
(with special thanks to Lucile Ernest Beckner)


1 cup granulated sugar
1 cup brown sugar
1 cup shortening; part butter (I used 1/2 cup shortening and 1/2 cup butter)
2 tsp. vanilla
3 eggs
5 cups flour
1 tsp. baking soda (added to flour)

Combine sugars, shortening and vanilla.  Add eggs one at a time to mixture, mixing between each egg.  Add flour and soda mixture (the dough will be quite stiff). Divide into 3 or 4 parts and roll out into rectangles between sheets of waxed paper.  Place dough rectangles on a baking sheet and chill while making filling.

Cook and cool:

1/2 pound (I used about 2 cups) coarsely chopped dates
1/2 cup brown sugar
1/2 cup water
1/2 cup chopped nuts (optional)

Spread cooked dates (once cooled) onto rolled out dough, roll up and chill.  Slice and place on ungreased baking sheet.  Bake at 400 for 8-10 minutes, until lightly browned.


The cookies are great warm, with a cup of coffee! I will be shipping some off to family members who are scattered all over the country, since I seem to be the only one making them this year...! I will be thinking of and missing my grandma as I eat "her" cookies this holiday season.  What are some of your "food" traditions? I'd love to hear about them!

Thursday, December 15, 2011


Aah, the second holiday party of the season was a success! It was my turn to host Girls Night, so I turned it into a "Holiday Girls Night" - with a few more additional guests than usual, and a festive menu. And cute take-home gifts I made: glittered champagne cork ornaments!
     One of my friends requested I make my marinated olives. I served them along side goat cheese "logs" rolled in either garlic and herbs or a sundried tomato seasoning - mmm! So, here is recipe number one from the evening:


An Olive Marinade

1 six-ounce can large black pitted olives, drained
1/4 cup olive oil
2 Tbl. chopped fresh oregano or basil (I used dried)
2 cloves garlic, mince
1 Tbl. balsamic vinegar
1/2 tsp. red pepper flakes
1/4 tsp. salt (optional)

Combine all ingredients in a zippered storage bag and shake to coat.  Refrigerate at least two hours and up to one month, serve at room temperature.  Before serving, transfer to serving dish.

I served a "girly" salad of mixed greens, sliced pears, Gorgonzola crumbles and glazed pecans with a mixed berry vinaigrette - oh my! The main course was super-simple yet very tasty; Bruschetta Chicken.  I think I found the recipe at www.kraft.com, if you want to check it out...I made a double batch, just in case my girlfriends were REALLY hungry...


Bruschetta Chicken Bake

one 14 1/2-ounce  can diced tomatoes, undrained
one 6-ounce package Stove Top Stuffing mix for Chicken (I used the Cornbread version)
1/2 cup water
1 1/2 pounds boneless skinless chicken breasts, cut into bite-sized pieces
1 tsp. dried basil leaves
1 cup shredded Mozzarella cheese

Preheat oven to 400.  Place tomatoes in medium bowl.  Add stuffing mix , water and garlic; stir just until stuffing mix is moistened.  Set aside.  Place chicken in a 13 X 9 baking dish; sprinkle with the basil and cheese.  Top with stuffing mixture.  Bake 30 minutes or until chicken is cooked through.

And for dessert, I made the most decadent thing I've ever served to guests; my Grandmother's "Gook", or sometimes referred to as "Goop". I really don't know it's "real" name, but "Gook" is what my family calls it.  It's absolutely "to die for"!   One of my girlfriends said, after tasting it, "where has this been my whole life?" I apologize for the crappy photo, I almost forgot to take one at all!


Gook (with special thanks to Edna Leatherman Alexander Troyer)

one 14-ounce can sweetened condensed milk
one "small" angel food cake (I ended up using 2/3 of a "normal" sized cake I made from a mix)
one 8-ounce container Cool Whip
1/2 cup chopped nuts (I used pecans)

"Caramelize" the can of condensed milk - put enough water in a pan to cover the can and boil for three hours. Add more water as it evaporates, so the can is always under water (it can explode without it's water bath).  Let cool.  

This is what the milk looks like after 3 hours...

Cut up cake into bit-sized pieces (I tore mine, which worked beautifully). Mix milk, Cool Whip and nuts in a bowl.  Pour over cake pieces and toss to coat. Do not over mix, or the cake will start to fall apart. Chill before serving.

Sunday, December 11, 2011


It's beginning to look a lot like Christmas...and I am SO busy! So much to do in such a short time, and only so many hours in a day! At my house, we (my husband and I, and now my husband, daughter and I) have a family get-together or two before Christmas, to enjoy the decorations, food and each other before the chaos of the holiday.  We used to host a pre-
Christmas meal a day or two before Christmas, but now my family members are spread all over the country.  Today, we are hosting my in-laws for lunch, and I made something "festive" for dessert: Magic Cookie Bars! I rarely make these, but was feeling nostalgic (my aunt makes them at Christmastime); and they make the house smell wonderful (and they taste good too)! I can't believe I didn't have the recipe in my "binder" (ginormous cook book) so had to look it up online. This recipe is from www.eaglebrand.com:


Magic Cookie Bars

1 1/2 cups graham cracker crumbs
1/2 cup butter, melted
one 14-ounce can sweetened condensed milk
2 cups (12 ounce package) semi-sweet chocolate chips
1 1/3 cups flaked coconut
1 cup chopped nuts (I used pecans)

Heat oven to 350.  Coat a 13 x 9-inch baking pan with no-stick cooking spray.  Combine graham cracker crumbs and butter in a small bowl.  Press into bottom of prepared pan.  Pour sweetened condensed milk evenly over crumb mixture.  Layer evenly with chocolate chips, coconut and nuts.  Press down firmly with a fork.  Bake 25-30 minutes or until lightly browned.  Loosen from sides of pan while still warm; cool on wire rack.  Cut into bars.

For perfectly cut cookie bars, line entire pan with foil, extending foil over edge of pan.  Coat lightly with no-stick cooking spray.  After bars have been baked and cooled, lift up edges of foil to remove from pan.  Cut into bars.


Works like a charm!

 
Later this week, I'd like to make Date Pinwheels (another family tradition) and gingerbread men, but I'm also hosting a Holiday Girls Night, and may not have time. Of course, that's what I say every day, and I still find time to fit a few "projects" in! Stay tuned!

Tuesday, December 6, 2011


Stressful times call for comfort food; in my case, Thai peanut chicken with noodles usually does the trick! I know, how exotic! Well, even in the Midwest we have access to Thai food! Tonight, however, I was in need of some calming, soothing, comforting food, and no one wanted to venture outside the house. Thankfully, I have a stash of specialty foods in my pantry for such an occasion.  Some supermarkets here actually carry rice noodles and Thai peanut sauce...and don't even get me started on the wasabi peas (my new addiction)! I must confess that sometimes Stouffers frozen macaroni and cheese comforts me too...but, back to the recipe of the day and how I prepared it:

Thai Peanut Chicken with Rice Noodles

1/2 package stir fry rice noodles (7-8 ounces)
two small raw boneless skinless chicken breasts, cut into small pieces
roughly a cup of frozen peas (no need to thaw; they will cook during the process)
Thai Peanut Sauce (I used a little more than half a cup) - and it was totally a bargain; I found it at one of those "dented can" stores!
1/2 cup finely chopped peanuts (optional)

Bring a large pot of water to a boil.  Remove from heat and immerse the rice noodles in the hot water; let stand 8 to 10 minutes, stirring occasionally.  Soak until noodles are soft but firm. Drain well.  In a wok or large frying pan, heat some vegetable oil over medium-high heat.  Add chicken and cook for a few minutes until no longer pink. Add peas and cook another minute or two.  Add peanut sauce, to taste, and stir to combine. Add softened noodles and toss to combine. You can also add chopped peanuts, cilantro or a little fresh-squeezed lime juice.

My 2 1/2 year old daughter and I ate it ALL! It definitely eased my stress; well, the glass of wine I had with it may have helped a little also! Why so stressed, you ask? Well, in addition to the stress of daily life, I'm dealing with this:


this (yes, I did the painting, and yes, the greenery is REAL):


decorating this (yes, the presents color-coordinate with the tree and house decorations, because, I'm sometimes a little insane),


and dealing with THIS  often stresses me out!  Ah, toddlers; or should that be "arrgh"?!?

Tuesday, November 29, 2011


We have a snow advisory today, with a predicted accumulation of anywhere from 2 to 8 inches! I quickly decided that my daughter and I are staying put. The following is a peek into our day. Fortified with homemade vegetable soup, courtesy of my stepfather, we have been quite busy and very productive!


Christmas card production is in full-swing, despite the annoyingly destructive"help" of my 2 1/2 year old daughter! Some projects just need to wait until her nap! I ordered my custom cards from Jelli + Ink, a Canadian vendor on www.etsy.com . Today, I'm lining envelopes with festive paper and adding glitter to the cards - fun!


Regan has kept busy with puzzles, coloring and watching DVDs on the living room couch; seriously, what a rough life she has!


And, of course, I always have new projects in the planning!

Monday, November 28, 2011


One of my girlfriends has a tradition of making Turkey Tetrazzini with her mother a day or two after Thanksgiving (with leftover turkey, of course), and I decided that I'd like to start that tradition with my daughter too. At 2 1/2 years old, she's only so much help, but she did enjoy the finished product!  The following is my version of the dish; a compilation of many, many recipes.

Turkey Tetrazzini

half of a one-pound  box of fettuccine, linguine or spaghetti, broken in half
1/2 cup sour cream
1 can cream of mushroom soup
1 small can sliced mushrooms
2 cups diced, cooked turkey (I may have actually used more like 3 cups)
1 cup bread crumbs (I actually used crushed Texas Toast croutons, which turned out exceptionally better than boring old seasoned bread crumbs)
1 cup shredded cheddar cheese

In a large saucepan of boiling salted water, cook the pasta until al dente.  Drain and set aside.  In a large bowl, combine sour cream, soup, mushrooms and turkey. Stir. Season with salt and pepper.  Add pasta and stir to combine. Transfer the mixture to a baking dish.  Preheat oven to 350.  In a small bowl, combine the bread crumbs and cheese. Sprinkle the bread crumb mixture over the pasta and bake for 15-20 minutes, until golden.

One recipe I consulted included a 9-ounce box of frozen creamed spinach, which sounded good to me, but then my husband would not have eaten dinner with us. Or, at least, would not have eaten what my daughter and I were having! I compromised by steaming some asparagus; win, win.


 So, hopefully, whipping up some Turkey Tetrazzini will be a new after-Thanksgiving tradition for me (and my daughter). I mean, seriously, what's not to like?

Friday, November 25, 2011


Happy Thanksgiving! My kitchen (especially my dishwasher) has been busy, busy, busy! I volunteered to take desserts to Thanksgiving at my in-law's house, so I decided on Peanut Butter Blossoms (see previous post) and Pumpkin Cheesecake, which I am trying to make into an annual tradition!  It's a bit of work to prepare, but is unbelievably scrumptious! I found this recipe in a magazine a year or so ago, and believe the credit is due to Kraft Foods. For this "project", you will need one of these:


Spiced Pumpkin Cheesecake

38 ginger snaps, finely crushed (I used my food processor)
1/4 cup finely chopped pecans (I opted not to include pecans)
1/4 cup melted butter
4 packages (8 ounces each) cream cheese, softened (I used Neufchatel cheese)
1 cup sugar
1 can (15 ounces) pumpkin
1 Tbl. pumpkin pie spice
1 tsp. vanilla
4 eggs

Heat oven to 325.  Mix crumbs, nuts and butter; press onto bottom and one-inch up side of a 9-inch springform pan.  Beat cream cheese and sugar with a mixer until blended. Add pumpkin, spice and vanilla; mix well.  Add eggs, one at a time, mixing after each, just until blended.  Pour into crust. Bake 1 hour 20 minutes to 1 hour 30 minutes or until center is almost set.  Loosen cake from rim of pan; cool before removing rim.  Refrigerate 4 hours.  Serve with dollop of whipped cream, if desired. 


It's even better the next day - take my word for it!

Tuesday, November 22, 2011


As the holiday season approaches, the activity in my kitchen increases - drastically! Last night, I kick-started the kitchen activity by making a double-batch of Chex party mix (which my family has already eaten vast quantities of...). Today it was cookies; specifically Peanut Butter Blossoms.  Every year at this time, my father-in-law requests these cookies. I usually take some to him at Thanksgiving and freeze a dozen or so for Christmas.  This year, I don't think they're going to last that long!  I'd like to thank my little helper this year, who now has enough dexterity in her 2 1/2 year old fingers to help unwrap an entire bag of chocolate kisses! She only ate two or three...

Peanut Butter Blossoms (recipe courtesy of Hershey's Kisses)

48 Hershey's Kisses
1/2 cup shortening
3/4 cup smooth peanut butter
1/3 cup granulated sugar
1/3 cup brown sugar
1 egg
2 Tbl. milk
1 tsp. vanilla extract
1 1/2 cups flour
1 tsp. baking soda
1/2 tsp. salt
granulated sugar

Heat oven to 375.  Remove foil from Kisses chocolates.  Beat shortening and peanut butter in  large bowl until well blended.  Add 1/3 cup granulated sugar and brown sugar; beat until fluffy.  Add egg, milk and vanilla; beat well.  Stir together flour, baking soda and salt; gradually beat into peanut butter mixture.  Shape dough into 1-inch balls.  Roll in granulated sugar; place on ungreased cookie sheet.  Bake 8 to 10 minutes or until lightly browned.  Immediately press a chocolate Kiss into center of each cookie; cookie will crack around the edges.  Remove from cookie sheet to wire rack and allow to cool completely.

Tomorrow: pumpkin cheesecake! Stay tuned!

It's "that time of year" again at my house; Chex party mix season! I usually make the FIRST batch around Thanksgiving, and make additional batches as it "disappears"! We graze on the mix until the new year; or when we finally run out! My paternal grandmother did the same thing, for as long as I can remember. I like carrying on her tradition (and making it my own), plus, my family just loves the stuff!  There have been times when my supper has consisted of Chex mix and a glass of wine during the holiday season...not that there's anything wrong with that...

I use the "old school" recipe; no microwave version for me! And, I usually double the recipe each time I make a batch, so it lasts longer.  Just in case, for some bizarre reason you don't have the recipe, here it is from the side of a Chex cereal box:

the original Chex Party Mix

6 Tbl. butter or margarine
2 Tbl. Lea & Perrins Worcestershire sauce
1 1/2 tsp. seasoned salt
3/4 tsp. garlic powder
1/2 tsp. onion powder (I've never actually used onion powder and it still tastes great)
3 cups Corn Chex
3 cups Rice Chex
3 cups Wheat Chex
1 cup mixed nuts
1 cup pretzels

Heat oven to 250.  Melt butter in large roasting pan in oven.  Stir in seasonings.  Gradually stir in remaining ingredients until evenly coated.  Bake one hour, stirring every 15 minutes.  Spread on paper towels to cool (I have never done this part, I just let it cool in the pan, or let my husband have some because he likes it warm).  Store in an airtight container.


So, what are you waiting for? Go make some Chex mix and get into the holiday spirit!

Saturday, November 19, 2011


Aah, there's nothing like comfort food...especially homemade French onion soup (at my house, at least). I make it a few times a year, and always when it's chilly outside - never in the summer.  I was given a big bag of onions recently, so it was a sure thing I was going to make French onion soup in the near future! My recipe is a combination of recipes I've tried over the years, and it sometimes varies depending on what I have in my pantry at the time. This is the version I made for supper tonight:

French Onion Soup

3-4 medium-sized onions, thinly sliced
4-5 Tbl. butter
1 Tbl. flour
2 cups beef stock
1 cup water
2 beef bouillon cubes
1 cup red wine
sliced French bread (or any crusty bread)
sliced cheese (Muenster, Monterey Jack or Swiss)


In a soup pot, melt butter and add onions.  Cook slowly, until very soft and golden. Sprinkle with flour and stir.  Add beef stock, water, bouillon and wine and simmer for 30 minutes.  Toast bread slices and butter.  Ladle soup into oven-safe cups or bowls.  Place toasted bread on top and then add sliced cheese on top of the bread. Broil until cheese is melted and lightly browned.  


If you want a "fancy schmancy" version, you could try Martha Stewart's recipe:


French Onion Soup (taken from Favorite Comfort Food by Martha Stewart)

4 Tbl. butter
2 pounds yellow onions, sliced into 1/4-inch half circles
1 tsp. sugar
1 Tbl. flour
1/2 cup dry sherry
6 cups beef broth
2 tsp. chopped fresh thyme or 3/4 tsp. dried thyme
salt and freshly ground pepper
1 small French baguette, sliced crosswise into 1/2-inch pieces
8 ounces Gruyere cheese, grated on the large holes of a box grater

Melt butter in a large Dutch oven or heavy pot on medium-low heat.  Add the onions.  Spread them out in as thin a layer as possible.  Sprinkle with sugar, and cook, stirring just as needed to keep the onions from sticking, until they are melting and soft, golden brown and beginning to caramelize; about one hour. 
     Sprinkle the flour over the onions and stir to coat.  Add the sherry, stock and thyme, and bring to a simmer.  Cook, partially covered, for about 30 minutes, to allow the flavors to combine.  Season with salt and pepper to taste.
     Meanwhile, lightly toast the bread and set aside.  Ladle the hot soup into ovenproof bowls.  Arrange the bowls on a baking sheet.  Place a slice of the toasted bread over each bowl of soup.  Sprinkle 1/2 cup of grated cheese over the bread in each bowl, and place under the broiler until the cheese is melted and crusty-brown around the edges.


Thursday, November 10, 2011


Last evening was my turn to host "girls night"; always an opportunity to share new recipes! This recipe is courtesy of my cousin Angie, and I've made it a few times before, but never for my girlfriends. They loved it! There was not a morsel left over! The photo above is actually NOT my casserole - I totally forgot to take some photos, until we'd already eaten most of it! This photo is from southerngirl09 at www.infobarrel.com, and looks pretty darn close to the casserole I made.

Chicken Delicious (thanks to Angela Beckner Grau)

4 boneless, skinless chicken breasts, cut into cubes
1 can cream of mushroom soup
1 cup mayonnaise (not Miracle Whip)
1 can sliced water chestnuts
cornbread stuffing mix
melted butter

Combine all ingredients except stuffing and butter.  Pour into greased baking dish. Combine stuffing mix with melted butter and top casserole.  Bake at 350 for 30 minutes.

Along with the casserole, I served my friends oven-roasted asparagus (see recipe below),  warm crusty bread and cold Sauvignon Blanc. For dessert, we had Snickers ice cream - oh yeah!

Oven-roasted Asparagus

1 lb. fresh asparagus
2 Tbl. olive oil
salt
freshly ground black pepper
grated Parmesan cheese

Preheat oven to 450.  Trim asparagus by snapping off the tough ends.  Drizzle 1 Tbl. olive oil all over the center of a rimmed baking sheet and spread the asparagus evenly in the pan, in a single layer.  Drizzle with the remaining olive oil and sprinkle with salt and pepper.  Roast 5 minutes for crisp-tender asparagus and 8 minutes for softer asparagus.  Transfer to a serving platter and sprinkle with Parmesan cheese; serve immediately!

Tuesday, November 8, 2011


I know, ANOTHER pasta recipe? My husband was gone for the evening, so it was an opportunity to make something for supper that contained lots of vegetables - what a treat! My daughter, the other vegetable-eater, really likes this dish. It's sooooo simple there's really not a recipe, but I'll list the ingredients I used. It's super quick and you don't need any sauce!

Quick Veggie Pasta

1/2 pound penne pasta
frozen vegetables (I used half a bag of something called Asparagus Stir Fry, which is loaded with an assortment of veggies)
garlic, minced
olive oil
butter
grated Parmesan cheese
freshly ground black pepper

Prepare the pasta according to the instructions on the package. While the pasta is boiling, put some olive oil in a large skillet and throw in the still-frozen vegetables and garlic.  Cook until tender. Drain the pasta and toss into the skillet with the vegetables.  Toss with butter and Parmesan. Season with pepper. There you go!

Monday, November 7, 2011


Ah, Autumn...if it didn't make me so sneezy, I'd love it even more! There is a little chill in the air here lately, but lots of sunshine. Yesterday was a perfect day for driving up into Michigan for a little "leaf peeping" and spending time at my Mom's cabin on the river. We had a "mini Thanksgiving" since she is leaving for Arizona (for the winter) in a week. It was nice enough to grill out and roast marshmallows by the river, and take the dogs on a walk down the "lane".

My Mom and step-father supplied the grilled chicken, homemade macaroni and cheese and baked apples. I took a bottle of red wine and made my "infamous" corn casserole. Actually, it's my Aunt Mary's recipe, and it's absolutely TO DIE FOR! It's a great Thanksgiving side dish; a few of us had "thirds" of the casserole yesterday - mmm!


Corn Casserole (thanks to Mary Ann Alexander Kray)

1 stick butter
1 15-ounce can corn (drained)
1 15-ounce can creamed corn
1 cup sour cream
1 box Jiffy corn bread mix

Melt the butter in a 2-quart cassrole dish and "swirl" to coat sides.  Add corn, sour cream and cornbread mix.  Stir and bake at 350 for one hour.
*For a more pudding-like casserole, use 2 cans of creamed corn and omit the "regular" corn.

If you'd like to make a more off-beat corn casserole, I have a recipe torn from a magazine years ago. I haven't tried it yet, but it sounds great!

Cheese Grits and Corn Pudding (recipe makes 8 individual servings)

1 1/2 cups milk
1 tsp. salt
1/4 cup grits
3/4 cup grated cheddar cheese
2 egg yolks
3/4 cup pureed canned corn
1/4 tsp. fresh-ground pepper
3 egg whites

To make the grits: bring milk to a simmer in a small saucepan over medium heat.  Add 1/2 tsp. salt and, stirring constantly, add grits in a slow, steady stream.  Continue stirring until thick - about 25 minutes.  Transfer to a large bowl and cool slightly.  To make the pudding: stir cheese, yolks and corn into the cooled grits.  Add remaining salt and pepper.  Beat egg whites in a large bowl until stiff peaks form.  Gently fold egg whites, in thirds, into the corn mixture.  Fill 8 one-cup ramekins and place on baking sheet.  Bake at 375 until "puffed" - 40 to 45 minutes. Serve immediately.


There will be more Thanksgiving-style recipes to come; you know I have a whole binder full of great ideas! Can you say pumpkin cheesecake? :)

Saturday, November 5, 2011


Today I co-hosted a baby "sprinkle" (it is the couple's second child, so we threw a "sprinkle" instead of a full-blown "shower" - it's all the rage right now...). It was a "girly" lunch of salads, fruit, crackers and dip and, of course, cupcakes with, you guessed it, SPRINKLES! Actually, I incorporated sprinkles in MANY ways - I love a theme!


I made two yummy salads: one with mixed greens, spinach, feta cheese, chicken, strawberries and glazed pecans served with a mixed berry vinaigrette -  oh my! The other salad was a twist on the traditional carry-in dinner taco salad, with iceberg lettuce, black beans, crushed taco-flavored tortilla chips, Mexican-blend shredded cheese and salsa - ole! I believe my friend's fruit dip (pictured above) was a combination of sugar, pineapple juice, whipping cream and egg whites (for fluffiness).


I made the confetti cupcakes from a mix (to save time) and tinted canned frosting pink, and yes, I made the cute cupcake toppers too!


And, in keeping with the whole cupcake/sprinkle theme, I made these felt "softies" for the new baby. My daughter, who's 2 1/2, now wants me to make her some too!