Monday, April 16, 2012

Chicken Spaghetti!


The other night I was looking in my pantry and was inspired by a can of cream of chicken  soup.  What I "threw together" was a dish loosely based on The Pioneer Woman's Chicken Spaghetti recipe http://thepioneerwoman.com/cooking/2007/06/chicken_spaghet/ , and man, was it good! My husband, who rarely comments on my cooking (unless he doesn't like something) said is was REALLY GOOD, and added that I should make it again - wow! I'm sure I've seen variations of this dish on Pinterest too. The following is my version of the recipe:

Chicken Spaghetti

8 ounces (half a box) spaghetti, broken in half or pieces
2 boneless, skinless chicken breasts
1 can cream of chicken soup
1 small can (I used 4 ounces) sliced mushrooms
seasoned salt
freshly ground black pepper
shredded cheddar cheese
breadcrumbs

Prepare spaghetti per package directions.  While the pasta is boiling, cook chicken breast in microwave until no longer pink inside.  Cut chicken into small pieces.  When pasta is ready, drain and place in large bowl.  Add chicken, soup, mushrooms, salt, pepper and half of the cheese.  Stir to mix.  Pour into a buttered baking dish and top with remaining cheese and then sprinkle breadcrumbs on top.  Bake at 350 for 30 minutes, or until cheese is melted.


So creamy, savory and cheesy! Mmm! I can't believe I've never made it before!

Friday, April 13, 2012


What do you do when stuck in the house all day with a preschooler? Make something YUMMY to eat! Many of you probably had these chewy treats in your elementary or middle school cafeteria; peanut butter cereal bars! I know I love 'em! I think our "lunch ladies" made them with Kix cereal, but Cheerios are what we had in the pantry. I combined a few recipes I found Online, and the following seems to be the most popular combination of ingredients. Of course, you could add anything to them; chocolate chips, peanuts, raisins, M&Ms, dried fruit, etc.  


Peanut Butter Cheerio Bars

1 cup light corn syrup
1 cup granulated sugar
1 cup peanut butter
6 cups Cheerios (or any kind of cereal)

Heat corn syrup and sugar in a pan on medium heat until sugar melts and mixture starts to bubble (boil).  Remove from heat and stir in peanut butter until melted.  Add cereal and stir until well combined. Pour into a buttered baking dish. When cool, cut into pieces and store in an airtight container.

See, easy peasy! You can also melt chocolate chips and "frost" the top of the cereal mixture before cutting into bars - oh yeah!

Sunday, April 8, 2012

Happy Easter!


This week, I made a cute gift in my kitchen for my girlfriends, but it wasn't something to eat: it was a yummy-smelling lemon and honey body scrub! I've seen variations of this scrub on Pinterest, and decided to try it out. The original "recipe" only made a small portion, so I increased it enough to make four half-pint jars. Below is MY version:

Lemon and Honey Body Scrub

1 1/2 cups granulated sugar
1/2 cup salt
60 drops of lemon juice (I couldn't figure out a conversion for this!)
honey (I used about a third of a bear-shaped squeeze bottle)

In a bowl, mix  the sugar and salt until well combined.  Add the lemon juice and enough honey to make a thick paste (I'm not sure if mine was thick enough). Divide between jars with tight-fitting lids (so it doesn't dry into one big sugary lump). Use as a scrub in the shower, or to really clean your hands after working out in the yard or garden.


Next time, I'm going to try a coffee scrub I just saw online! Mmmmm!

Saturday, April 7, 2012

Pink Lemonade Cupcakes!


I'm responsible for dessert for two Easter get-togethers this weekend, and was thinkin' CUPCAKES, mostly because I found a new flavor of cake mix and frosting: PINK LEMONADE! Yes please! Top them with some Jelly Belly jellybeans and it's Easter all over the place!  And yes, they taste lemony and zingy and very PINK!

Thursday, April 5, 2012

A "green" meal for spring!


Last night it was my turn to host Girls Night, and of course, I tried out a NEW recipe! Have you noticed that pattern with me? Last night's menu contained a lot of GREEN, though purely coincidentally! The appetizer was a wedge of Parmesan cheese and olives (some of them were green). The entree was a recipe from Real Simple magazine ( www.realsimple.com): Pesto Meatballs and Couscous. I "borrowed" their photo (above) ; my photo is below. They were absolutely awesome! I will definitely make them again - yum!


Pesto Meatballs and Couscous (adapted from Real Simple magazine)

2 Tbl. olive oil
1 1/2 pounds ground beef (I used 1.2 pounds of ground turkey)
1/2 cup dried bread crumbs
3/4 cup jarred pesto
1 large egg
1 1/2 tsp. salt
3/4 tsp. black pepper
a 10-ounce box couscous (I used 1 1/3 cups of Israeli couscous, per the package instructions)
1/4 cup grated Parmesan cheese

Heat oven to 350 degrees.  Drizzle olive oil into a baking tray and tilt to coat.  In a large bowl, combine the beef, bread crumbs, 1/2 cup of pesto, egg, salt and pepper.  With your hands, mix just until combined.  Shape the mixture into 12 meatballs (somehow, I ended up with 21), using about 1/4 cup for each.  Transfer meatballs to baking tray and bake for 15 minutes.  Turn and bake until cooked through, about 10-15 minutes more.


Meanwhile, prepare the couscous according to the package directions.  I loved the size of Israeli couscous; it seemed heartier than the tiny "regular" couscous.


In a small bowl, combine the remaining 1/4 cup pesto with a tablespoon of olive oil (I added some water too).  Spoon the mixture over the cooked meatballs and turn to coat.  Divide the meatballs among individual plates and sprinkle with Parmesan cheese.

* I spooned the pesto "sauce" over the couscous too - it was delicious!

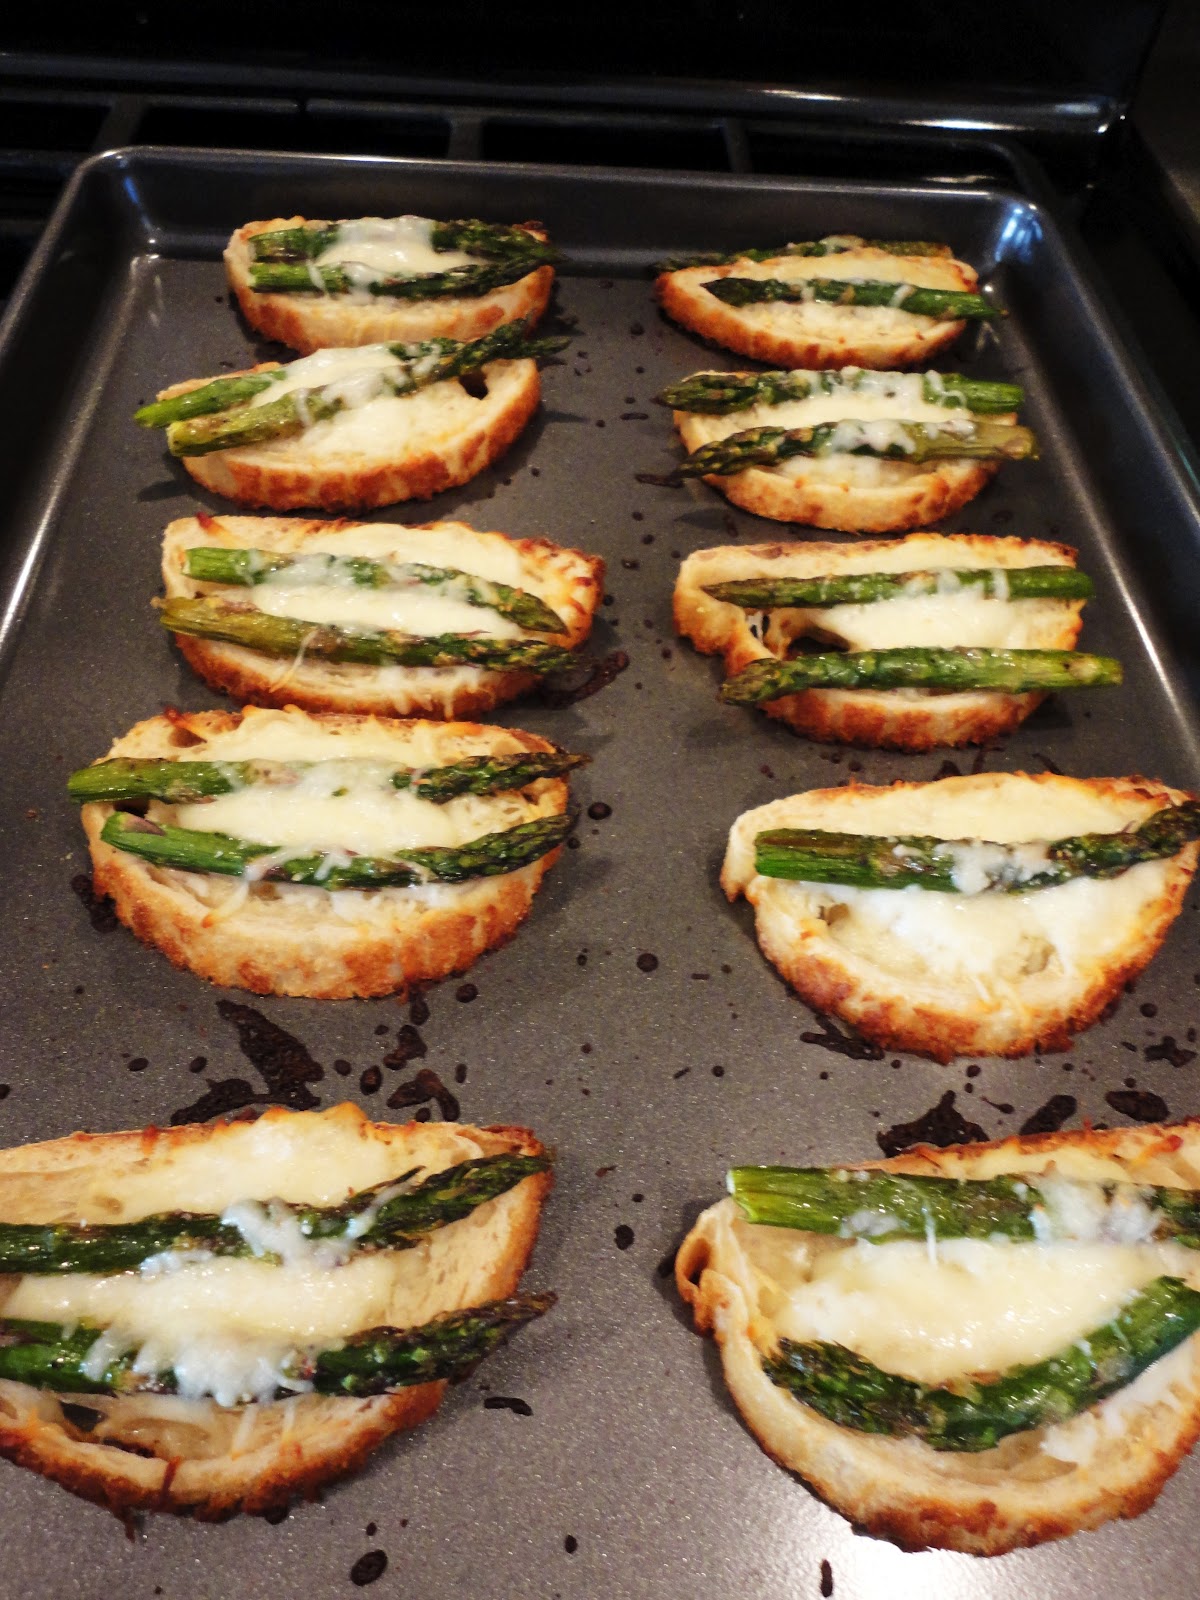
Also, instead of a veggie side dish or a salad, I made what I call "asparagus bread": cut a rustic French or Italian loaf of bread into slices. Top with shredded cheese (I used a Parmesan and mozzarella combo). Top the cheese with asparagus spears; either steamed or "oven grilled" (drizzle with olive oil, salt and pepper to taste and bake at 450 for 5-8 minutes). Sprinkle with a little more cheese and bake at 350 degrees until cheese melts - soooooo good!


For dessert, we had mango sorbet - so refreshing (thanks, Susie)! Seriously, what is not to like about Girls Night? Yahoo!

Tuesday, April 3, 2012


The.Best.Iced.Coffee.Ever...I am in HEAVEN! I had been meaning to try Ree Drummond's (www.thepioneerwoman.com) iced coffee recipe for months, and finally just buckled down and did it! The prep work is a little time consuming, but the result is unbelievable! Several other girls, whose "mom blogs" I follow, have also made this fabulous concoction. Check out Larissa @ http://mmmcrafts.blogspot.com. She describes the process really well. Once I get the prep work down to a tee, I will be drinking this iced coffee concoction for the entire summer; and perhaps, the rest of my life!


Iced Coffee (adapted from The Pioneer Woman)

1 gallon water (I bought a gallon of drinking water so I could also use the container to hold the "base", or "concentrate)
1-pound bag of coffee (I used 10 ounces of espresso - see above photo)
coffee filters or paper towels
a strainer
pitcher or jug, big enough to hold a gallon of liquid

Pour the coffee into a very large bowl.  Add the water and stir until all the grounds are saturated with water.  Let set for 12 hours, or overnight.  Line a strainer with coffee filters or paper towels (the paper towels worked better, but I had to replace them often) and set on top of the pitcher.


Pour or ladle the coffee mixture into the strainer.  This part takes a while, as the coffee drips through the filters or paper towels.


Once all the coffee concentrate has been filtered, stick it in the fridge (it will last for a month).


Another "mom blogger" I found on Pinterest    (http://homesteadinghousewife.blogspot.com/2011/07/last-iced-coffee-recipe-youll-ever-need.html)  suggested combining a 12-ounce can of evaporated milk with a 14-ounce can of sweetened condensed milk to make "Sweet Cream".


To prepare the iced coffee, fill a glass to the top with ice (I used the crushed ice feature on my fridge).  Pour the coffee concentrate into the glass, a little past half full.  Add the sweet cream until full, or to taste. Stir and enjoy! And I do mean ENJOY! I may drink this twice a day, every day, until the concentrate is gone - woo hoo!

Monday, April 2, 2012


Warm Italiano Spread


Yesterday, we went to my Mom's cabin in Michigan for a cook-out, and I made an appetizer I've been dying to try: a cheesy, gooey, pesto-y dip/spread that you can make on the grill! I think I found the recipe at www.kraftrecipes.com, if you want to check it out. It was ridiculously good! I definitely need to make it for Girls Night some time; it could be a meal in itself! It's also super quick, easy and portable, so it's perfect for cook-outs or camping - yum!

Warm Italiano Spread

an 8-ounce package of Neufchatel cheese (low-fat cream cheese substitute)
1/4 cup pesto
1 plum tomato, diced (I used grape tomatoes, halved)
1/4 cup shredded Italian blend cheese
crackers ( I used Cracked Pepper & Olive Oil Triscuits)

Heat grill to medium heat.  Place unwrapped Neufchatel cheese on an 8-inch square of heavy duty aluminum foil; top with pesto, tomatoes and shredded cheese.  Place foil packet on grill; cover with lid.  Grill 8-10 minutes or until shredded cheese is melted and Neufchatel cheese is softened, but still holding its shape.  Transfer foil to platter. Serve with crackers.

* To prepare in your oven: bake at 375 for 12-14 minutes.


Along with the gooey, grilled appetizer, I made a variation of a "Shandy"; a lemony beer "cocktail". I just combined a pilsner beer with a capful of bottled lemon juice and garnished with a lemon slice.  Oh, how refreshing! There are a million different ways to make this drink - go out there and try it!