Sunday, July 15, 2012

Zucchini Parmesan Crisps


Yes, yet ANOTHER zucchini recipe: and it won't be the last! My garden is exploding, so bear with me...just wait until my tomatoes are ripe! Anywho, I tried something different with zucchini last night for supper and it was super tasty! And talk about easy: there are only a few ingredients!  I think these chip-like slices of zucchini would make a great appetizer too.


Zucchini Parmesan Crisps 

1 lb. zucchini or squash (about 2 medium-sized)
1/4 cup shredded parmesan (heaping)
1/4 cup Panko breadcrumbs (heaping)
1 tablespoon olive oil
1/4 teaspoon kosher salt
freshly ground pepper, to taste

Preheat oven to 400 degrees. Line two baking sheets with foil and spray lightly with vegetable spray. Slice zucchini or squash into 1/4 inch-thick rounds. Toss rounds with oil, coating well. In a wide bowl or plate, combine breadcrumbs, parmesan, salt and pepper.  Place rounds in parmesan-breadcrumb mixture, coating both sides of each round, pressing to adhere. The mixture will not completely cover each round, but provides a light coating on each side.  Place rounds in a single layer on baking sheets. Sprinkle any remaining breadcrumb mixture over the rounds.  Bake for about 22 to 27 minutes, until golden brown. (There is no need to flip them during baking -- they crisp up on both sides as is.)


My three-year-old said they were "nummy"...I think she was spot on!

Friday, July 13, 2012

Deluxe Green Beans


In my family, you know it's summer if all you have for supper is green beans, well, DELUXE green beans. My paternal grandmother made this every summer when I was growing up. She let hers simmer on the stove for hours until the green beans started to fall apart - delish! My small green bean crop (three bean "teepees") yields just enough to make this dish a few times, and freeze a few bags for later. There's no recipe per se, but here's how I make green beans:

Pour some olive oil in a stock pot or dutch oven, throw in some chopped up bacon (I use turkey bacon, so the olive oil is primarily to keep it from sticking - if you use REAL bacon, you don't really need the olive oil). Cook the bacon till crispy, then add some diced onion and cook on low until soft. Add a few cups of water and toss in freshly snapped green beans and quartered red potatoes or those really trendy fingerling potatoes). Simmer until the potatoes are soft. Season with salt and pepper. Yum!

Tonight, along with the "deluxe green beans"  I had an open-faced cheese and tomato "sandwich": slice of bread topped with slice of tomato topped with sliced co-jack cheese. Broil in toaster oven till cheese is melted. Enjoy!

Tuesday, July 10, 2012

It's Blueberry Time!


Today, Regan, my Mom and I went to the Beech Road Blueberry Farm (in Wakarusa) to pick blueberries. Because of the drought and horrid heat we've had the past month, the berries were not as large as last year, but still pretty plentiful! What to do with pounds and pounds of blueberries, you say?


First, you wash them and spread them out on baking sheets to dry,


freeze said berries for 1-2 hours,


then bag them up in freezer bags for future use!


 I set aside quite a few fresh berries for making blueberry muffins (and eating) - yum!  I know I've posted at least two blueberry muffin recipes in the past, but not this one:


It's a combination of several recipes I've tried over the years. I think I made the recipe card (with cutesy lettering) about 20 years ago. Don't you just love the name of the recipe?


Christie's Excellent Blueberry Muffins (makes 24)

3 1/2 cups flour
1/4 tsp. salt
4 tsp. baking powder
1 1/4 cups sugar
2 beaten eggs
1 cup orange juice
1/2 cup vegetable oil (I use safflower)
1 1/2 cups blueberries

Topping:

3 Tbl. brown sugar
1 tsp. cinnamon

Preheat oven to 375 degrees.  Mix all ingredients 28 strokes by hand, until blended (I added the blueberries last, just folding in briefly). Line muffin tin with cupcake papers and fill 3/4 full.  Sprinkle cinnamon/sugar topping on each muffin.  Bake for 20-25 minutes. (I use dark, non-stick muffin tins and have found that turning down the heat a little prevents browning on the bottoms).


These muffins are really moist and have a hint of orange flavor. My favorite part, besides the fresh blueberries, is the crunchy topping!

Monday, July 9, 2012

Got Zukes?


Ah yes, the zucchini plants are in full-force now! I swear, there are two new ripe ones every day in my garden! And new ones starting every day, too! So, what do I do with all that squash? Here are two options:


shred 'em (I remove the seeds but leave the peel),


bag 'em and freeze
(I freeze two cups per bag for zucchini bread/muffin recipes),


make zucchini bread!


I think I found this recipe online (big surprise) last year, but had not tried it until this week. It's SUPER moist and has a yummy twist: Nutella! Regan, of course, loves it! Enjoy!


Nutella Zucchini Swirl Bread

2 cups all-purpose flour
1 1/2 tsp. baking soda
3/4 tsp. baking powder
1 tsp. salt
3 1/2 tsp. cinnamon (this is NOT a typo; I only used 1 tsp. though)
3 eggs
1 cup vegetable oil
1 1/2 cups granulated sugar
2 cups freshly grated zucchini
2 tsp. vanilla extract
1/3 cup Nutella

Preheat oven to 350 degrees.  Grease one 9 x 5-inch loaf pan.  Sift together flour, baking soda, baking powder, salt and cinnamon into a bowl.  In a separate bowl, stir together eggs, oil, sugar, zucchini and vanilla.  Make sure it is fully combined.  Pour flour mixture into egg mixture, stirring until completely combined.  Pour entire mixture into loaf pan.  Dollop the Nutella on top and swirl it into the batter with a dull knife.  Bake for 40-45 minutes, or until a toothpick comes out clean and the top is set.  You will know the bread is done when the center springs back when lightly touched.


The Nutella kind of sunk to the bottom of my bread. I think I "swirled" it a little too much, but it still tasted great when biting into a big glob of chocolate! Yum!

Wednesday, July 4, 2012

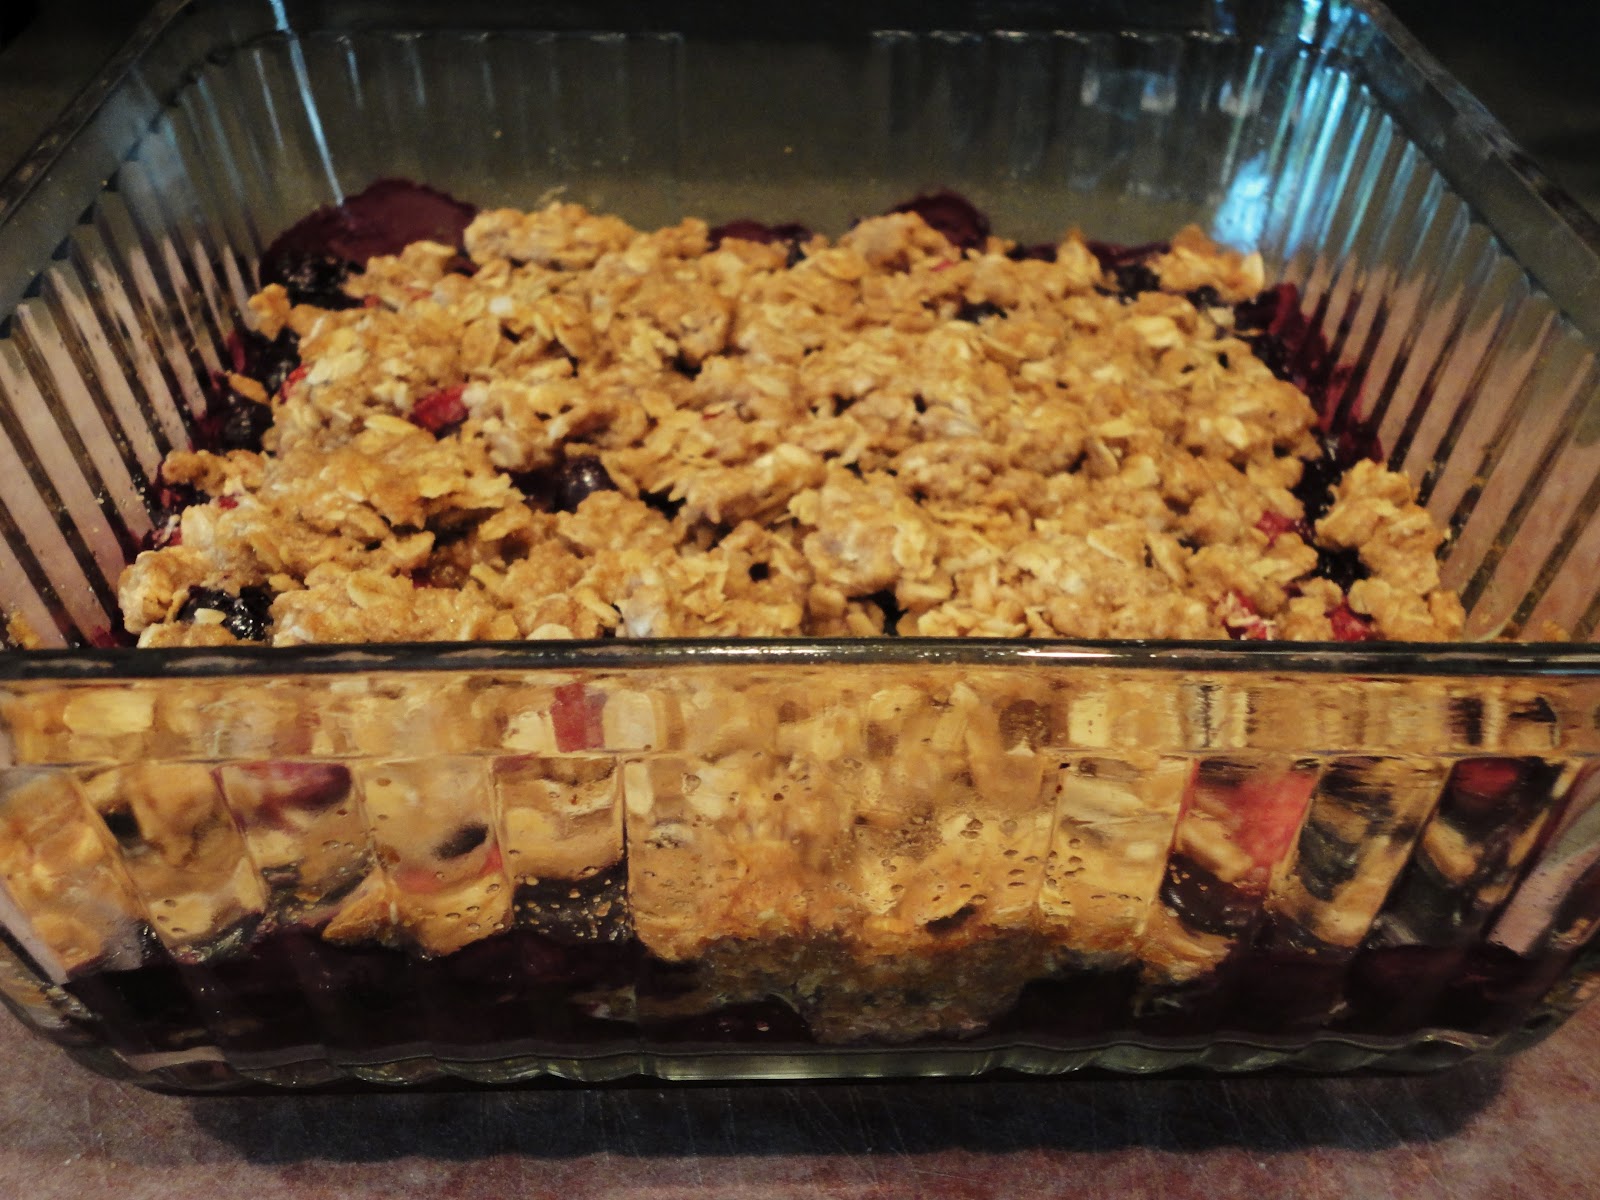
Berry Crisp!


Today is Independence Day, so I made a festive red and blue dessert to take to my Mom's for our cookout; Berry Crisp (with blueberries and red raspberries). This is a variation of the late 1970's Apple Crisp recipe from Girl Scouts that I've made millions of times (okay, not MILLIONS, but too many times to count!). This recipe works with any kind of fruit, from apples and peaches to rhubarb and berries (one of my personal favorites is peach/blueberry). Enjoy!

Berry Crisp

1 cup oatmeal
1/2 cup flour
1/2 cup brown sugar
1/4 tsp. salt
1 tsp. cinnamon
1/2 cup (one stick) butter, softened
4 cups berries

Blend oats, flour, sugar, salt and cinnamon.  Cut in butter using a pastry blender (I used my stand mixer).  Pour berries into a buttered baking dish.  Top with oatmeal mixture.  Bake at 350 for 30 minutes.


I'm looking forward to eating this with a big glob of vanilla ice cream - oh yeah!

Friday, June 29, 2012

Shoppin' Amish


If you don't already know, I live in "Amishland". In Indiana there are Amish communities scattered here and there, just like in Ohio and Pennsylvania. I live just on the edge of several of these communities. The benefit is terrific produce stands (no pestisides! good soil! great prices!), wonderful cheese, brown eggs from free-range chickens, hand-crafted furniture...and..."dented can" stores! Yesterday, Regan and I hit both a produce stand and a "dented can" (aka discount grocery) store. Regan always likes checking out the "barn cats" and horses (and buggies and horse carts, too!). I like how super friendly and helpful the Amish "entrepreneurs" are. Oh, and the prices are always low (another plus)!


Despite the name, "dented can" stores usually don't have products in dented cans (or crushed packaging), or foods past their expiration date, but sometimes you do run into both dented cans and salad dressing dated three months ago. What I like is spending $25-$30 for a box full of pantry items! The stores also have fresh produce,baked goods (the one I go to has a whole Pepperidge Farm section), a frozen food section, and sometimes, a deli with meat and cheese. One of the quirks of these stores is that you never know what's going to be on the shelves. Sometimes I go back to get more of an item, and it has disappeared.


Sometimes, you hit gold, like these great items I found yesterday! Starbucks ground coffee for $2.99! I only bought four bags this time, and threw them in the freezer. The Snapple green tea  was 50 cents a can, so I bought quite a few. The coolest thing I found was the "veggie" Kraft macaroni and cheese (69 cents a box). According to the package, the pasta is made with cauliflower - I can't wait to try it out!

The other great thing about driving out to these Amish businesses is the exposure to other ways of living that my daughter is getting. She sees kids riding horses and swimming in ponds. She can tell the difference between cornfields, soybean fields and wheat fields.  She has watched men bale hay and plow with a horse team. And she loves to see baby animals, like calves, colts and piglets. And how proud am I of her when she picks out her own canteloupe from a farm stand and lovingly carries it back to the car as she urges me to hurry home so she can eat it!

Thursday, June 28, 2012


Last night was my turn to host Girls Night, so you know what that means: new recipes! I've been wanting to make "white sangria" for some time now, and yesterday's 90-something temps were perfect for a cold, fruity and alcoholic beverage! I skimmed several recipes online and came up with this combo:

1 bottle sauvignon blanc
1 bottle prosecco or champagne
2 peaches, pitted, peeled and sliced
1 kiwi, peeled and sliced
a large "handful" red raspberries
2-3 Tbl. sugar

Mix all ingredients together in a pitcher and refrigerate for at least an hour to let the flavors combine. I really tasted the raspberries a lot, and one of my girlfriends said she could really taste the peaches...either way, it was wonderful! We drank the pitcher rather quickly and ate the fruit too!

While we were sipping our sangria, I set out jarred peach/mango salsa and some multigrain tortilla chips. For the "main event" I made something I just saw on Pinterest this week: Corn and Zucchini Quesadillas. They were pretty simple/easy to make, and super tasty! I am sooooo making them again! I can always use new recipes for zucchini; my garden is popping them out like crazy already!


 Corn and Zucchini Quesadillas (thanks to www.ezrapoundcake.com)

olive oil
one onion, chopped
salt
4 cloves garlic, minced
2 medium zucchini (about a pound), halved lengthwise and thinly sliced crosswise
1 cup frozen corn
1/4 cup chopped fresh cilantro
6 or 8-inch flour tortillas
2 cups shredded cheese (like Monterey Jack or Pepper Jack)

Preheat oven to 400 degrees.  In a large skillet, heat oil over medium heat.  Add onion and some salt.  Cook, stirring occasionally, until onion is soft, about 5 minutes.  Stir in garlic and cook for one minute more.  Add zucchini and frozen corn.  Cook, stirring occasionally, until zucchini is soft and corn is tender, about 6 minutes.  Remove from heat; stir in cilantro.  Place two or three tortillas on a baking sheet.  Spoon filling onto each tortilla  and then sprinkle with cheese.  Top each with another tortilla and press down gently with spatula to seal.  Bake until cheese has melted and tortillas start to brown, turning once, about ten minutes.  Remove from oven and let cool slightly. To serve, cut eat quesadilla into wedges.

*You can also brush the outsides of the tortillas with olive oil, for a crispier texture.  


I served the quesadillas with Cilantro Lime Rice (see 6/3/12 post for recipe), which got rave reviews! It's just so LIME-Y! I finished up the meal with zesty lemon sorbet (refreshing!)

 Oh, how I love fresh, tasty summer cooking!